
There’s something magical about the satisfying crunch of perfectly fried katsu paired with fluffy steamed rice and a drizzle of sweet-tangy tonkatsu sauce. This Japanese Katsu Bowls with Tonkatsu Sauce recipe brings together crispy panko-crusted cutlets, fresh vegetables, and that irresistible umami-rich sauce that makes every bite absolutely addictive. What started as a Western-influenced dish in Japan during the Meiji era has become a beloved comfort food that’s surprisingly easy to recreate at home. The beauty of katsu bowls lies in their versatility – whether you’re using pork, chicken, or even vegetables, the golden crispy coating and that glossy, slightly sweet sauce transform simple ingredients into something extraordinary. With just a few pantry staples and some basic frying techniques, you’ll have restaurant-quality bowls that rival your favorite Japanese restaurant.
What You’ll Need for Perfect Katsu Bowls
For the Katsu:
- 4 boneless pork chops or chicken breasts (about 6 oz each), pounded to ½-inch thickness
- 1 cup all-purpose flour
- 2 large eggs, beaten
- 2 cups panko breadcrumbs
- 1 teaspoon salt
- ½ teaspoon black pepper
- Vegetable oil for deep frying (about 4 cups)
For the Tonkatsu Sauce:
- ⅓ cup ketchup
- 2 tablespoons Worcestershire sauce
- 1 tablespoon soy sauce
- 1 tablespoon brown sugar
- 1 teaspoon Dijon mustard
- 1 clove garlic, minced
For the Bowls:
- 4 cups cooked Japanese short-grain rice
- 1 cucumber, thinly sliced
- 2 carrots, julienned
- 4 cups shredded cabbage
- 2 green onions, sliced
- Sesame seeds for garnish
Smart Substitutions: For gluten-free katsu, use rice flour and gluten-free panko. Vegetarians can substitute thick slices of eggplant or firm tofu. If you can’t find panko, regular breadcrumbs work, though they won’t be quite as crispy.
Timing Your Katsu Bowl Success
This Japanese Katsu Bowls with Tonkatsu Sauce recipe comes together in about 45 minutes total. Here’s your time breakdown: 15 minutes for prep work (including making the sauce and setting up your breading station), 20 minutes for frying the katsu, and 10 minutes for assembly and final touches.
Time-Saving Tips: Cook your rice ahead of time – it actually works better when it’s not piping hot. While the oil heats up, prep your vegetables and make the tonkatsu sauce. The sauce can be made up to a week in advance and stored in the refrigerator. If you’re serving a crowd, you can bread the cutlets earlier in the day and keep them chilled until frying time.
How to Make It
1. Create Your Flavor-Packed Tonkatsu Sauce
Whisk together ketchup, Worcestershire sauce, soy sauce, brown sugar, Dijon mustard, and minced garlic in a small bowl until smooth. The sauce should have a glossy, pourable consistency with a beautiful reddish-brown color. Taste and adjust sweetness or tanginess to your preference – some people love extra Worcestershire for that deeper umami punch.
2. Set Up Your Breading Station Like a Pro
Arrange three shallow dishes in assembly-line fashion: flour seasoned with salt and pepper in the first, beaten eggs in the second, and panko breadcrumbs in the third. This setup prevents messy cross-contamination and ensures even coating. Pat your meat completely dry with paper towels – moisture is the enemy of crispy coating.
3. Coat Each Cutlet for Maximum Crunch
Dredge each piece first in seasoned flour, shaking off excess, then dip into beaten eggs, allowing excess to drip off. Finally, press firmly into panko breadcrumbs, ensuring complete coverage on both sides. The key is gentle pressure – you want the crumbs to adhere without compacting. Let breaded cutlets rest on a wire rack for 10 minutes to help the coating stick.
4. Heat Oil to the Perfect Frying Temperature
Heat vegetable oil in a heavy-bottomed pot or deep fryer to 340°F. Use enough oil so cutlets can float freely – usually about 3 inches deep. Test the temperature by dropping a few panko crumbs into the oil; they should sizzle immediately and turn golden within 30 seconds. Maintaining proper temperature prevents greasy, soggy katsu.
5. Fry to Golden Perfection
Carefully lower cutlets into hot oil using tongs, frying no more than two pieces at once to avoid temperature drops. Fry for 3-4 minutes on the first side until deep golden brown, then flip and fry another 3-4 minutes. The internal temperature should reach 145°F for pork or 165°F for chicken. Listen for that steady, vigorous sizzling – silence means the oil isn’t hot enough.
6. Drain and Rest for Optimal Texture
Transfer fried katsu to a wire rack set over paper towels, allowing excess oil to drain while keeping the bottom crispy. Let rest for 3-5 minutes before slicing – this prevents the juices from running out and keeps the meat tender. Slice into ½-inch strips using a sharp knife with a gentle sawing motion to preserve the crispy coating.
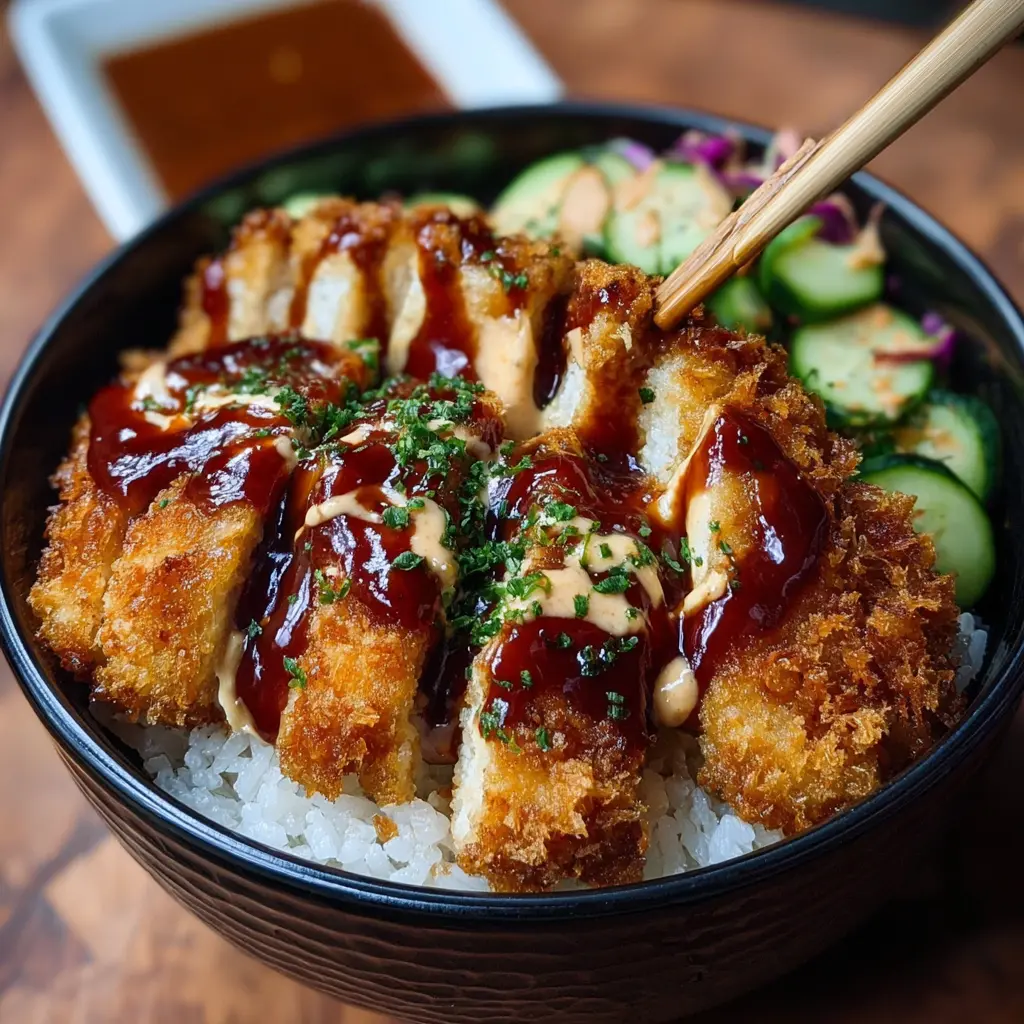
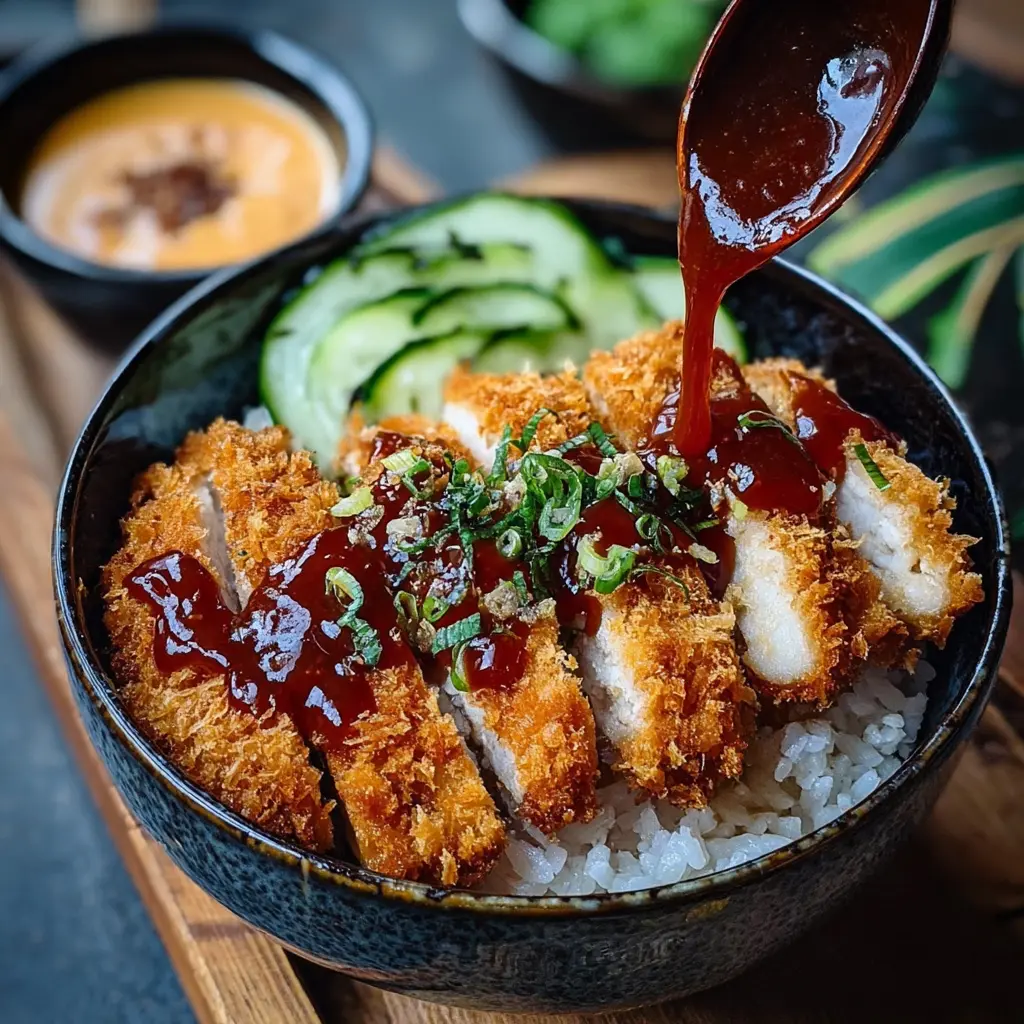
7. Build Beautiful, Balanced Bowls
Place a generous mound of warm rice in each bowl, creating a slight well in the center. Arrange sliced katsu over the rice, then artfully add fresh vegetables around the bowl – cucumber slices, julienned carrots, and crisp cabbage create wonderful color contrast and textural variety. Drizzle generously with tonkatsu sauce and sprinkle with sliced green onions and sesame seeds.
Nutritional Highlights
Each serving of Japanese Katsu Bowls with Tonkatsu Sauce provides approximately 650-750 calories, depending on portion size and frying method. You’ll get a substantial amount of protein (about 35-40 grams) from the meat, complex carbohydrates from the rice, and beneficial fiber from the fresh vegetables.
The dish offers good amounts of B vitamins, particularly B6 and B12 from the meat, plus vitamin C from the cabbage and carrots. While this is definitely an indulgent meal due to the frying process, the fresh vegetables add important nutrients and help balance the richness. The homemade tonkatsu sauce contains less sodium and preservatives than many store-bought versions.
Healthier Alternatives for Guilt-Free Enjoyment
Transform this Japanese Katsu Bowls with Tonkatsu Sauce recipe into a lighter version by baking instead of frying. Spray breaded cutlets with cooking oil and bake at 425°F for 15-20 minutes, flipping halfway through. While you’ll sacrifice some crispiness, you’ll cut calories significantly.
For a lower-carb option, serve katsu over cauliflower rice or zucchini noodles instead of regular rice. Increase the vegetable portions and add steamed broccoli or snap peas for extra nutrition. You can also use chicken breast instead of pork for leaner protein, or try thick portobello mushroom caps for a satisfying vegetarian version.
Create a gluten-free version using almond flour for dredging and certified gluten-free panko crumbs. The texture remains surprisingly similar, and the nutty flavor from almond flour adds an interesting dimension.
Creative Serving Ideas
These Japanese Katsu Bowls with Tonkatsu Sauce shine when served family-style, allowing everyone to customize their bowls. Set out additional toppings like pickled daikon, corn kernels, cherry tomatoes, or avocado slices for a personalized experience.
For special occasions, try serving the katsu over sushi rice seasoned with rice vinegar for extra flavor complexity. Japanese curry makes an excellent alternative sauce, creating katsu curry bowls that are equally delicious. Pair with ice-cold Japanese beer or green tea to complete the authentic experience.
Consider deconstructing the bowl into a bento-style presentation with each component in separate compartments – perfect for packed lunches or picnics.
Common Mistakes to Avoid
The biggest mistake when making Japanese Katsu Bowls with Tonkatsu Sauce is not maintaining proper oil temperature. Too-cool oil creates greasy, soggy coating, while too-hot oil burns the outside before cooking the inside. Invest in a reliable thermometer and adjust heat as needed.
Don’t skip the resting period after breading – it helps the coating adhere properly. Avoid pressing down on katsu while frying, which compresses the crispy coating and can cause oil to splatter.
Another common error is slicing the katsu immediately after frying, causing juices to run out and making the meat dry. Let it rest those crucial few minutes for juicier results.
Finally, don’t drown the dish in sauce initially – it’s better to start with less and let people add more to their preference.
Smart Storage Solutions
Store leftover components separately for best results. Cooked katsu keeps in the refrigerator for up to 3 days in an airtight container, though it’s best enjoyed fresh for optimal crispiness. The tonkatsu sauce stays fresh for up to one week refrigerated and actually improves in flavor as it sits.
Leftover rice can be stored for 3-4 days and reheated with a splash of water in the microwave. Fresh vegetables should be stored separately and added just before serving to maintain their crunch.
To reheat katsu, use a toaster oven or regular oven at 350°F for 5-7 minutes rather than the microwave, which makes the coating soggy. For meal prep, consider keeping components separate and assembling fresh bowls as needed.
Final Thoughts
This Japanese Katsu Bowls with Tonkatsu Sauce recipe brings restaurant-quality flavors right to your kitchen, combining crispy textures with fresh ingredients and that irresistible sweet-tangy sauce. The beauty lies in its adaptability – make it healthier, switch up proteins, or add your favorite vegetables to create your signature version.
Don’t be intimidated by the frying process; with proper temperature control and timing, you’ll achieve that perfect golden crust every time. The satisfaction of creating these beautiful, delicious bowls from scratch is truly rewarding, and the smiles around your dinner table will prove it was worth every minute.
Give this recipe a try and discover why katsu bowls have captured hearts worldwide. Share your creative variations and let us know how your family enjoys this delightful fusion of flavors and textures!
Frequently Asked Questions
Can I make the katsu ahead of time?
Yes! Bread the cutlets up to 4 hours ahead and refrigerate them on a wire rack. You can also fry them earlier in the day and reheat in a 350°F oven for 5-7 minutes to restore crispiness.
What’s the best oil for frying katsu?
Vegetable oil, canola oil, or peanut oil work excellently due to their high smoke points and neutral flavors. Avoid olive oil, which has a lower smoke point and strong flavor that can overpower the dish.
Can I substitute the tonkatsu sauce?
Absolutely! Try teriyaki sauce, spicy mayo mixed with sriracha, or even a simple soy sauce and rice vinegar combination. Each creates a different but delicious flavor profile.
How do I know when the katsu is properly cooked?
Use a meat thermometer – pork should reach 145°F internal temperature, chicken 165°F. The exterior should be deep golden brown and crispy. If you don’t have a thermometer, cut into the thickest part to check that juices run clear.
What if my panko coating falls off during frying?
This usually happens when the oil isn’t hot enough or the coating wasn’t pressed firmly enough. Ensure oil is at proper temperature (340°F) and let breaded cutlets rest before frying to help coating adhere.
Can I freeze cooked katsu?
While possible, freezing significantly affects the crispy texture. If you must freeze, wrap individually and freeze for up to 1 month. Reheat from frozen in a 375°F oven until heated through and crispy.

Japanese Katsu Bowls with Tonkatsu Sauce Recipe
- Total Time: 45 minutes
- Yield: Serves 2
Description
There’s something magical about the satisfying crunch of perfectly fried katsu paired with fluffy steamed rice and a drizzle of sweet-tangy tonkatsu sauce. This Japanese Katsu Bowls with Tonkatsu Sauce recipe brings together crispy panko-crusted cutlets,
Ingredients
For the Katsu:
- 4 boneless pork chops or chicken breasts (about 6 oz each), pounded to ½-inch thickness
- 1 cup all-purpose flour
- 2 large eggs, beaten
- 2 cups panko breadcrumbs
- 1 teaspoon salt
- ½ teaspoon black pepper
- Vegetable oil for deep frying (about 4 cups)
For the Tonkatsu Sauce:
- ⅓ cup ketchup
- 2 tablespoons Worcestershire sauce
- 1 tablespoon soy sauce
- 1 tablespoon brown sugar
- 1 teaspoon Dijon mustard
- 1 clove garlic, minced
For the Bowls:
- 4 cups cooked Japanese short-grain rice
- 1 cucumber, thinly sliced
- 2 carrots, julienned
- 4 cups shredded cabbage
- 2 green onions, sliced
- Sesame seeds for garnish
Instructions
Whisk together ketchup, Worcestershire sauce, soy sauce, brown sugar, Dijon mustard, and minced garlic in a small bowl until smooth. The sauce should have a glossy, pourable consistency with a beautiful reddish-brown color. Taste and adjust sweetness or tanginess to your preference – some people love extra Worcestershire for that deeper umami punch.
Arrange three shallow dishes in assembly-line fashion: flour seasoned with salt and pepper in the first, beaten eggs in the second, and panko breadcrumbs in the third. This setup prevents messy cross-contamination and ensures even coating. Pat your meat completely dry with paper towels – moisture is the enemy of crispy coating.
Dredge each piece first in seasoned flour, shaking off excess, then dip into beaten eggs, allowing excess to drip off. Finally, press firmly into panko breadcrumbs, ensuring complete coverage on both sides. The key is gentle pressure – you want the crumbs to adhere without compacting. Let breaded cutlets rest on a wire rack for 10 minutes to help the coating stick.
Heat vegetable oil in a heavy-bottomed pot or deep fryer to 340°F. Use enough oil so cutlets can float freely – usually about 3 inches deep. Test the temperature by dropping a few panko crumbs into the oil; they should sizzle immediately and turn golden within 30 seconds. Maintaining proper temperature prevents greasy, soggy katsu.
Carefully lower cutlets into hot oil using tongs, frying no more than two pieces at once to avoid temperature drops. Fry for 3-4 minutes on the first side until deep golden brown, then flip and fry another 3-4 minutes. The internal temperature should reach 145°F for pork or 165°F for chicken. Listen for that steady, vigorous sizzling – silence means the oil isn’t hot enough.
Transfer fried katsu to a wire rack set over paper towels, allowing excess oil to drain while keeping the bottom crispy. Let rest for 3-5 minutes before slicing – this prevents the juices from running out and keeps the meat tender. Slice into ½-inch strips using a sharp knife with a gentle sawing motion to preserve the crispy coating.
Place a generous mound of warm rice in each bowl, creating a slight well in the center. Arrange sliced katsu over the rice, then artfully add fresh vegetables around the bowl – cucumber slices, julienned carrots, and crisp cabbage create wonderful color contrast and textural variety. Drizzle generously with tonkatsu sauce and sprinkle with sliced green onions and sesame seeds.
Nutrition
- Calories: 650-750
- Protein: 35-40 grams