

My own journey with this rustic no knead rosemary garlic bread began during a particularly hectic winter when I craved homemade bread but couldn’t spare hours for traditional kneading and multiple rises. The first time I tried this method, I was skeptical. How could something so simple produce results that tasted like they came from a European bakery?
The secret lies in fermentation science. When we give flour and water extended time to mingle with just a whisper of yeast, magical transformations occur. The flour’s proteins develop into gluten naturally through hydration and time, while the slow fermentation creates complex flavors and that coveted open, irregular crumb structure.
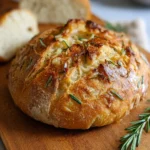
Adding aromatic rosemary and pungent garlic to this foundation creates a bread that’s simultaneously rustic and sophisticated. The herbs infuse every bite with Mediterranean warmth, while the long fermentation process mellows the garlic into sweet, nutty notes that complement rather than overpower.
This bread connects us to centuries of baking tradition while embracing modern convenience—a perfect marriage of old-world technique and contemporary lifestyle demands.
Ingredients List
Base Bread Ingredients:
- 3 cups (360g) all-purpose flour, plus extra for dusting
- 1/4 teaspoon active dry yeast (yes, just 1/4 teaspoon!)
- 1 1/4 teaspoons fine sea salt
- 1 3/4 cups warm water
Aromatic Additions:
- 2 tablespoons fresh rosemary, finely chopped (or 1 tablespoon dried)
- 4 garlic cloves, minced
- 2 tablespoons olive oil, divided
For Assembly:
- Additional flour for dusting
- Coarse sea salt for sprinkling
- Fresh rosemary sprigs for garnish
Smart Substitutions:
- Gluten-Free: Replace all-purpose flour with a 1:1 gluten-free flour blend, though texture will be denser
- Herb Alternatives: Thyme, oregano, or sage work beautifully in place of rosemary
- Garlic-Free: Caramelized onions or roasted shallots provide sweet, aromatic complexity
- Whole Grain: Substitute up to 1 cup all-purpose flour with whole wheat flour for nuttier flavor
- Vegan-Friendly: This recipe is naturally plant-based when using olive oil
The beauty of this rustic bread lies in its flexibility—feel free to experiment with different herb combinations or add a handful of olives or sun-dried tomatoes for Mediterranean flair.
Timing
Total Time: 18-24 hours (mostly hands-off)
Active Preparation: 15 minutes
Initial Rise: 12-18 hours
Shaping & Second Rise: 2 hours
Baking Time: 45 minutes
Time Management Strategy:
- Day 1 Evening (5 minutes): Mix the dough before dinner
- Day 2 Evening (10 minutes): Shape and begin second rise
- Day 2 Later Evening: Bake and enjoy
Make-Ahead Magic:
The extended fermentation actually improves flavor, so don’t worry if your timing runs a bit long. The dough can ferment for up to 24 hours in cool conditions. For busy schedules, start the dough on Friday evening for fresh bread Saturday night, or begin Sunday morning for Monday evening enjoyment.
Multi-Tasking Opportunities:
While the dough rises, prep soup, salad, or other dinner components. During the final 2-hour rise, the dough needs minimal attention, perfect for tackling other kitchen tasks or simply relaxing.
How to Make It
1. Create the Foundation
In a large mixing bowl, whisk together flour, yeast, and salt until evenly distributed. This dry mixing ensures the tiny amount of yeast spreads throughout, creating even fermentation. Create a well in the center and pour in the warm water along with 1 tablespoon olive oil.
Using a wooden spoon or clean hands, stir until you achieve a shaggy, sticky dough with no dry flour visible. Don’t worry about smoothness—this rustic mixture should look rough and somewhat chaotic. The magic happens during the long rest.
2. Add the Aromatic Elements
Fold in the minced garlic and chopped rosemary, distributing them throughout the sticky dough. The garlic will mellow and sweeten during fermentation, while the rosemary will infuse its pine-like fragrance throughout every strand of gluten.
Cover the bowl tightly with plastic wrap or a damp kitchen towel. The goal is creating a humid environment that prevents the surface from drying out while allowing fermentation to work its magic.
3. The Patient Rise
Place the covered bowl in a cool, draft-free location for 12-18 hours. Room temperature (68-72°F) is ideal—cooler temperatures slow fermentation while warmer conditions accelerate it. You’ll know it’s ready when the dough has doubled in size and the surface appears bubbly with a slightly sweet, yeasty aroma.
Don’t be alarmed if the timing varies based on your kitchen’s temperature and humidity. This forgiving process adapts to your schedule.
4. Shape with Care
Turn the risen dough onto a heavily floured surface—it will be quite sticky, which is exactly right. With floured hands, gently fold the dough over itself several times, creating surface tension without aggressive kneading.
Shape into a rough round, seam-side down. Place on parchment paper, cover with a clean kitchen towel, and let rise for 2 hours until noticeably puffed.
5. Preheat for Perfect Crust
About 30 minutes before baking, place a heavy Dutch oven with its lid in the oven and preheat to 450°F. This creates a steam chamber that produces the crackling, artisan-style crust that makes this bread so special.
6. The Grand Finale
Carefully remove the hot Dutch oven. Using the parchment paper as a sling, lower the dough into the pot. Brush the surface with the remaining olive oil, sprinkle with coarse sea salt and fresh rosemary sprigs.
Cover and bake for 30 minutes, then remove the lid and continue baking for 15 minutes until deep golden brown. The internal temperature should reach 200-210°F for optimal texture.
Cool on a wire rack for at least 1 hour before slicing—this resting period allows the crumb structure to set properly.
Nutritional Information
Per Serving (1/8 of loaf):
- Calories: Approximately 180
- Carbohydrates: 35g
- Protein: 5g
- Fat: 2g
- Fiber: 1g
- Sodium: 390mg
Nutritional Highlights:
This rustic no knead rosemary garlic bread provides complex carbohydrates for sustained energy, while the extended fermentation process makes nutrients more bioavailable and easier to digest. Rosemary contributes antioxidants and anti-inflammatory compounds, while garlic offers immune-supporting properties.
The olive oil provides heart-healthy monounsaturated fats, and the slow fermentation process creates beneficial compounds that support digestive health. Unlike commercial breads loaded with preservatives and additives, this homemade version contains only wholesome, recognizable ingredients.
Note: Nutritional values are approximate and may vary based on specific ingredients used and portion sizes.
Healthier Alternatives for the Recipe
Lower Calorie Options:
- Reduce olive oil to 1 tablespoon total, supplementing with additional water if needed
- Create smaller individual rolls for built-in portion control
- Serve alongside vegetable-based soups and salads to create satisfying, lower-calorie meals
Gluten-Free Adaptations:
Replace all-purpose flour with your favorite gluten-free blend, though expect a denser texture. Add 1 teaspoon xanthan gum if your blend doesn’t include it. The fermentation time may be shorter, so monitor closely.
Whole Grain Boost:
Substitute up to half the all-purpose flour with whole wheat flour for increased fiber and nutrients. You may need to add 2-3 tablespoons additional water as whole grains absorb more liquid.
Reduced Sodium Version:
Cut salt to 1 teaspoon and rely more heavily on herbs and garlic for flavor. Consider adding dried herbs like oregano or thyme to compensate for the reduced salt.
Heart-Healthy Enhancements:
- Add 2 tablespoons ground flaxseed for omega-3 fatty acids
- Incorporate chopped walnuts for healthy fats and protein
- Use extra virgin olive oil for maximum antioxidant benefits

Serving Suggestions
This rustic no knead rosemary garlic bread shines in countless serving scenarios. Slice it thick and toast lightly for the ultimate garlic bread to accompany pasta dishes or hearty soups. The herbs and garlic make it a natural partner for Mediterranean-inspired meals—think ratatouille, minestrone, or rustic tomato salads.
For entertaining, present the whole loaf on a wooden cutting board with good olive oil for dipping, alongside olives, cheese, and cured meats for an effortless antipasto spread. The bread’s rustic appearance adds authentic charm to any gathering.
Transform leftovers into spectacular croutons by cubing and toasting with additional olive oil and herbs. These golden gems elevate simple salads into restaurant-worthy dishes.
During colder months, nothing beats thick slices alongside steaming bowls of vegetable soup or hearty stews. The bread’s open crumb structure makes it perfect for soaking up flavorful broths.
Seasonal Variations:
- Summer: Pair with fresh tomato and basil salads
- Fall: Serve alongside butternut squash soup and roasted vegetables
- Winter: Perfect with hearty bean soups and braised dishes
- Spring: Complement with fresh herb salads and light vegetable dishes
Common Mistakes to Avoid
Over-Mixing the Initial Dough:
Resist the urge to achieve smoothness during initial mixing. The shaggy, rough texture is exactly what you want—over-mixing can lead to tough bread.
Inadequate First Rise:
Don’t rush the 12-18 hour fermentation. Under-fermented dough won’t develop proper flavor or texture. Look for doubled size and a bubbly surface before proceeding.
Insufficient Flour During Shaping:
This dough is intentionally sticky. Use generous amounts of flour on your work surface and hands to prevent sticking without incorporating excess flour into the dough itself.
Skipping the Dutch Oven Preheat:
The hot pot creates essential steam for proper crust development. Don’t shortcut this step—your patience will be rewarded with superior texture.
Cutting Too Soon:
I know it’s tempting, but slicing into hot bread results in gummy texture and compressed crumb. Allow at least one hour of cooling for optimal results.
Inconsistent Oven Temperature:
Invest in an oven thermometer to ensure accuracy. Temperature variations significantly impact crust development and overall texture.
Storing Tips for the Recipe
Room Temperature Storage:
Wrap cooled bread in a clean kitchen towel and store in a bread box or paper bag for 2-3 days. Avoid plastic bags, which soften the crust and can promote mold growth.
Refrigerator Storage:
While not ideal for texture, wrapped bread keeps in the refrigerator for up to one week. Toast slices lightly to restore some crispness before serving.
Freezer Storage:
This rustic no knead rosemary garlic bread freezes beautifully for up to three months. Wrap tightly in plastic wrap, then aluminum foil to prevent freezer burn. Freeze whole loaves or pre-slice for convenient single servings.
Reheating Instructions:
- Whole loaf: Wrap in foil and warm in 350°F oven for 10-15 minutes
- Individual slices: Toast lightly or warm in toaster oven
- From frozen: Thaw overnight at room temperature, then reheat as above
Reviving Day-Old Bread:
Sprinkle the crust lightly with water and warm in a 350°F oven for 5-10 minutes to restore crispness.
Conclusion
This rustic no knead rosemary garlic bread proves that exceptional baking doesn’t require complicated techniques or professional equipment—just quality ingredients, patience, and trust in the process. The long, slow fermentation creates complex flavors and textures that rival expensive artisan breads, while the minimal hands-on time fits seamlessly into busy schedules.
Every time you pull this golden, fragrant loaf from your oven, you’re participating in an ancient tradition while embracing modern convenience. The combination of aromatic rosemary, mellow garlic, and perfectly developed bread creates something truly special that will have family and friends asking for your secret.
Don’t be surprised if this recipe becomes your go-to for dinner parties, cozy nights at home, or whenever you need the therapeutic ritual of bread-making without the fuss. The forgiving nature of this technique builds confidence while delivering consistently delicious results.
Give this recipe a try, and don’t forget to share your variations and experiences. Did you experiment with different herbs? Try the whole wheat version? I’d love to hear how this rustic beauty graced your table!
FAQs
Can I use instant yeast instead of active dry yeast?
Absolutely! Use the same amount of instant yeast as called for with active dry yeast. Instant yeast doesn’t require proofing and can be mixed directly with the dry ingredients.
What if my dough seems too wet or sticky?
This dough is intentionally quite sticky—that’s what creates the open, irregular crumb structure. During shaping, use plenty of flour on your work surface and hands rather than adding flour to the dough itself.
Can I make this bread without a Dutch oven?
While a Dutch oven produces the best results, you can use a heavy oven-safe pot with a tight-fitting lid, or bake on a baking stone with a steam pan. Place a metal pan filled with hot water on the oven’s bottom rack to create steam.
How do I know when the bread is fully baked?
The crust should be deep golden brown and sound hollow when tapped on the bottom. For precision, use an instant-read thermometer—the internal temperature should reach 200-210°F.
Can I add other ingredients like olives or sun-dried tomatoes?
Yes! Add up to 1/2 cup of chopped olives, sun-dried tomatoes, or cheese during the initial mixing stage. Drain wet ingredients thoroughly to prevent excess moisture in the dough.
Why didn’t my bread rise properly?
Check your yeast’s expiration date and ensure your water wasn’t too hot, which can kill yeast. Also, very cold environments slow fermentation significantly—try placing the bowl in a slightly warmer location like on top of the refrigerator.
Rustic No Knead Rosemary Garlic Bread
- Total Time: 18-24 hours (mostly hands-off)
- Yield: Serves 4
Description
The secret lies in fermentation science. When we give flour and water extended time to mingle with just a whisper of yeast, magical transformations occur. The flour’s proteins develop into gluten naturally through hydration and time, while the slow fermentation creates complex flavors and that coveted open, irregular crumb structure.
Ingredients
Base Bread Ingredients:
- 3 cups (360g) all-purpose flour, plus extra for dusting
- 1/4 teaspoon active dry yeast (yes, just 1/4 teaspoon!)
- 1 1/4 teaspoons fine sea salt
- 1 3/4 cups warm water
Aromatic Additions:
- 2 tablespoons fresh rosemary, finely chopped (or 1 tablespoon dried)
- 4 garlic cloves, minced
- 2 tablespoons olive oil, divided
For Assembly:
- Additional flour for dusting
- Coarse sea salt for sprinkling
- Fresh rosemary sprigs for garnish
Smart Substitutions:
- Gluten-Free: Replace all-purpose flour with a 1:1 gluten-free flour blend, though texture will be denser
- Herb Alternatives: Thyme, oregano, or sage work beautifully in place of rosemary
- Garlic-Free: Caramelized onions or roasted shallots provide sweet, aromatic complexity
- Whole Grain: Substitute up to 1 cup all-purpose flour with whole wheat flour for nuttier flavor
- Vegan-Friendly: This recipe is naturally plant-based when using olive oil
The beauty of this rustic bread lies in its flexibility—feel free to experiment with different herb combinations or add a handful of olives or sun-dried tomatoes for Mediterranean flair.
Instructions
In a large mixing bowl, whisk together flour, yeast, and salt until evenly distributed. This dry mixing ensures the tiny amount of yeast spreads throughout, creating even fermentation. Create a well in the center and pour in the warm water along with 1 tablespoon olive oil.
Using a wooden spoon or clean hands, stir until you achieve a shaggy, sticky dough with no dry flour visible. Don’t worry about smoothness—this rustic mixture should look rough and somewhat chaotic. The magic happens during the long rest.
Fold in the minced garlic and chopped rosemary, distributing them throughout the sticky dough. The garlic will mellow and sweeten during fermentation, while the rosemary will infuse its pine-like fragrance throughout every strand of gluten.
Cover the bowl tightly with plastic wrap or a damp kitchen towel. The goal is creating a humid environment that prevents the surface from drying out while allowing fermentation to work its magic.
Place the covered bowl in a cool, draft-free location for 12-18 hours. Room temperature (68-72°F) is ideal—cooler temperatures slow fermentation while warmer conditions accelerate it. You’ll know it’s ready when the dough has doubled in size and the surface appears bubbly with a slightly sweet, yeasty aroma.
Don’t be alarmed if the timing varies based on your kitchen’s temperature and humidity. This forgiving process adapts to your schedule.
Turn the risen dough onto a heavily floured surface—it will be quite sticky, which is exactly right. With floured hands, gently fold the dough over itself several times, creating surface tension without aggressive kneading.
Shape into a rough round, seam-side down. Place on parchment paper, cover with a clean kitchen towel, and let rise for 2 hours until noticeably puffed.
About 30 minutes before baking, place a heavy Dutch oven with its lid in the oven and preheat to 450°F. This creates a steam chamber that produces the crackling, artisan-style crust that makes this bread so special.
Carefully remove the hot Dutch oven. Using the parchment paper as a sling, lower the dough into the pot. Brush the surface with the remaining olive oil, sprinkle with coarse sea salt and fresh rosemary sprigs.
Cover and bake for 30 minutes, then remove the lid and continue baking for 15 minutes until deep golden brown. The internal temperature should reach 200-210°F for optimal texture.
Cool on a wire rack for at least 1 hour before slicing—this resting period allows the crumb structure to set properly.
Nutrition
- Calories: 180
- Sodium: 390mg
- Fat: 2g
- Carbohydrates: 35g
- Fiber: 1g
- Protein: 5g