
Picture this: you walk into your favorite upscale restaurant and see that beautifully plated seared ahi tuna on the menu – you know, the one with the gorgeous pink center and perfectly caramelized exterior that makes your mouth water instantly. Now imagine creating that same restaurant-quality dish in your own kitchen in just 10 minutes. That’s exactly what this simple seared ahi tuna recipe delivers.
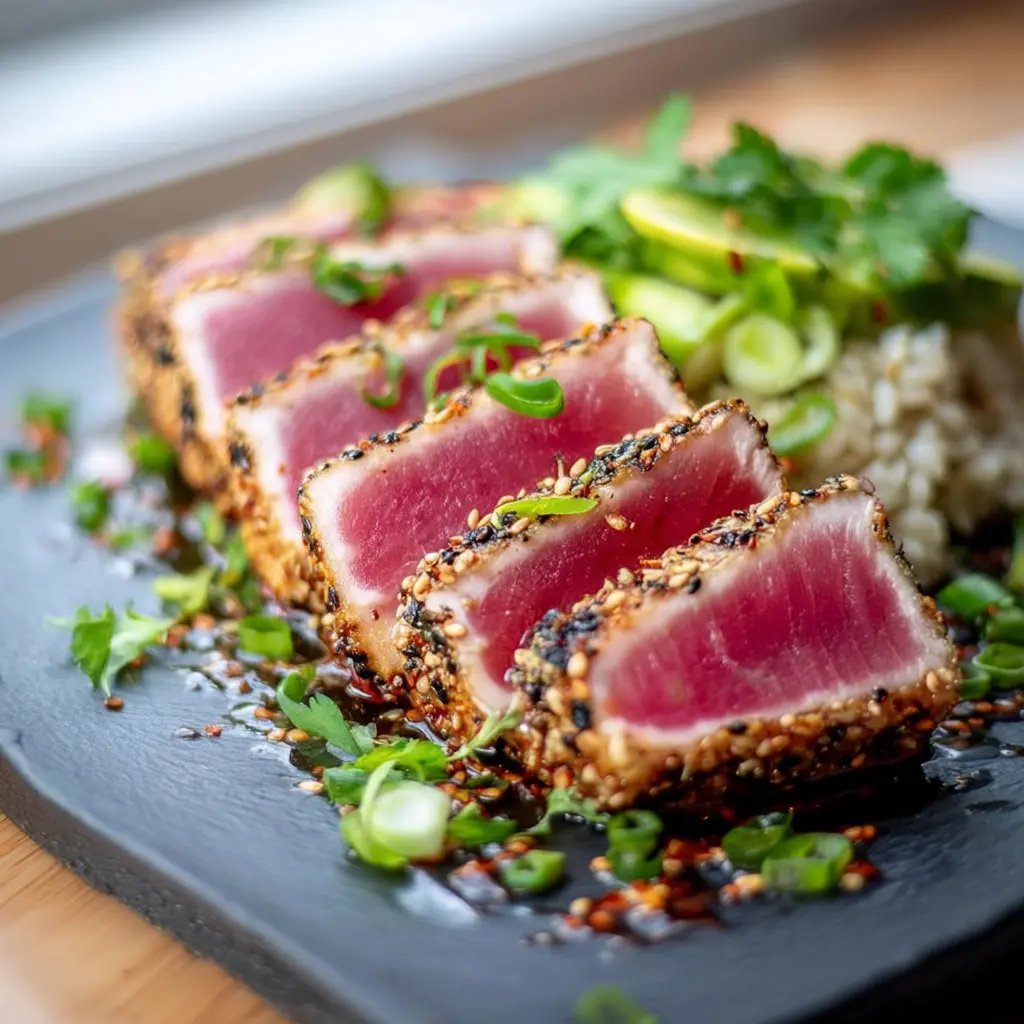
There’s something almost magical about the contrast between the warm, crispy sesame crust and the cool, buttery-soft center that makes seared ahi tuna such a show-stopper. This dish has its roots in Japanese tataki cooking techniques, where high-quality fish is briefly seared while keeping the interior completely raw. The result is pure elegance on a plate – and surprisingly simple to achieve at home.
Ingredients List
For the Tuna:
- 1 pound sushi-grade ahi tuna steaks (about 1-inch thick)
- 2 tablespoons sesame oil
- 3 tablespoons black sesame seeds
- 3 tablespoons white sesame seeds
- 1 teaspoon kosher salt
- 1/2 teaspoon black pepper
For the Soy Ginger Sauce:
- 1/4 cup low-sodium soy sauce
- 2 tablespoons rice wine vinegar
- 1 tablespoon fresh ginger, finely grated
- 1 teaspoon honey
- 1/2 teaspoon sesame oil
For Garnish:
- 1 avocado, sliced
- 2 scallions, thinly sliced
- 1 cucumber, julienned
- Pickled ginger (optional)
- Wasabi (optional)
Substitution Notes: Can’t find black sesame seeds? Use all white sesame seeds instead. For gluten-free options, ensure your soy sauce is tamari. If you’re avoiding sesame, try a light coating of crushed pistachios or macadamia nuts for a different but equally delicious crust.
Timing
This recipe lives up to its promise of being table-ready in 10 minutes:
- Prep Time: 5 minutes
- Cooking Time: 3-4 minutes
- Total Time: 8-9 minutes
Time Management Tips: While your tuna comes to room temperature (about 15 minutes before cooking), prepare your sauce and slice your garnishes. Have everything ready to go before you heat the pan – once you start searing, things move quickly!
Make-Ahead Options: The soy ginger sauce can be prepared up to 3 days in advance and stored in the refrigerator. You can also prep your garnishes earlier in the day and keep them covered in the fridge.
How to Make It
1. Prepare the Tuna
Remove your sushi-grade ahi tuna from the refrigerator 15-20 minutes before cooking to bring it closer to room temperature. Pat the steaks completely dry with paper towels – this step is crucial for achieving that perfect sear. Brush all sides lightly with sesame oil.
Chef’s Secret: The drier the surface, the better the sear. Don’t skip the patting dry step, even if it seems excessive.
2. Create the Sesame Crust
In a shallow dish, combine black sesame seeds, white sesame seeds, kosher salt, and black pepper. Mix well with your fingers to distribute evenly. Press each tuna steak firmly into the mixture, coating all sides generously. The oil will help the seeds adhere beautifully.
Pro Tip: Use the palm of your hand to really press those seeds into the fish. You want them to stick well so they don’t fall off during searing.
3. Make the Soy Ginger Sauce
While the tuna sits, whisk together soy sauce, rice wine vinegar, grated ginger, honey, and sesame oil in a small bowl until the honey dissolves completely. Taste and adjust – you might like it a bit sweeter or more tangy.
4. Heat Your Pan
Place a heavy-bottomed skillet or cast-iron pan over medium-high heat. Let it get properly hot – you should feel strong heat when you hold your hand about 6 inches above the surface. Don’t add any oil to the pan; the sesame oil on the tuna is sufficient.
Visual Cue: The pan is ready when a drop of water sizzles and evaporates immediately.
5. Sear the Tuna
Gently place the tuna steaks in the hot pan. You should hear an immediate, satisfying sizzle. Sear for 1-2 minutes per side, depending on thickness. You want a golden-brown crust with about 1/4 inch of cooked fish around the edges while keeping the center completely pink and cool.
Critical Point: Resist the urge to move or press the tuna. Let it sear undisturbed to develop that gorgeous crust.
6. Rest and Slice
Remove the tuna to a cutting board and let it rest for 1 minute. Using a very sharp knife, slice against the grain into 1/4-inch thick slices. Clean your knife between cuts for the cleanest presentation.
Nutritional Information
Each serving (approximately 4 ounces) provides:
- Calories: 280-320
- Protein: 35-40g
- Healthy fats: 12-15g
- Carbohydrates: 3-5g
Ahi tuna is an excellent source of lean protein and omega-3 fatty acids, which support heart and brain health. The sesame seeds add healthy fats, fiber, and minerals like calcium and magnesium. This dish is naturally low in carbohydrates and provides sustained energy.
Note: Nutritional values are approximate and may vary based on specific ingredients and portion sizes.
Healthier Alternatives for the Recipe
Lower Calorie Version: Skip the sesame oil brushing and use cooking spray instead. Replace the sesame seed crust with a mixture of crushed herbs like cilantro, parsley, and a pinch of sea salt.
Gluten-Free Option: Ensure your soy sauce is tamari or coconut aminos. The rest of the recipe is naturally gluten-free.
Reduced Sodium Alternative: Use low-sodium tamari and reduce the amount by half, adding fresh lime juice for extra flavor without the salt.
Different Protein Options: This technique works beautifully with salmon, yellowtail, or even thick slices of firm tofu for plant-based eaters.

Serving Suggestions
Present your sliced seared ahi tuna fanned out on individual plates over a bed of mixed greens or alongside sushi rice. Drizzle the soy ginger sauce artfully around the plate and garnish with avocado slices, cucumber julienne, and sliced scallions.
Perfect Pairings: Serve with edamame, seaweed salad, or Asian cucumber salad. For beverages, try sake, crisp white wine, or green tea.
Portion Guidance: Plan for 4-6 ounces of tuna per person as a main course, or 2-3 ounces for an elegant appetizer.
Special Occasion Twist: Serve on small individual plates with chopsticks for an authentic touch, or create a seared ahi tuna bowl with sushi rice, avocado, and pickled vegetables.
Common Mistakes to Avoid
Using Regular Tuna: Only use sushi-grade ahi tuna from a reputable fishmonger. Regular grocery store tuna isn’t safe to eat rare.
Overcooking: The most common mistake is leaving the tuna in the pan too long. Remember, you want it just barely cooked on the outside.
Wet Fish Surface: Failing to pat the tuna dry will result in steaming rather than searing, preventing that beautiful crust from forming.
Cold Pan: Starting with a pan that isn’t hot enough won’t give you the quick sear you need to keep the interior raw.
Dull Knife: A dull knife will tear the fish rather than slice it cleanly, ruining the presentation.
Storing Tips for the Recipe
Immediate Consumption Recommended: Seared ahi tuna is best enjoyed immediately after cooking for optimal texture and food safety.
Short-Term Storage: If you must store leftovers, wrap tightly and refrigerate for no more than 24 hours. The texture will change, but it’s still safe to eat.
Sauce Storage: The soy ginger sauce keeps well in the refrigerator for up to one week in an airtight container.
Make-Ahead Components: Prepare garnishes and sauce ahead of time, but always sear the tuna fresh for the best results.
Not Freezer Friendly: Once seared, this dish doesn’t freeze well due to texture changes in the fish.
Conclusion
This simple seared ahi tuna recipe proves that restaurant-quality elegance doesn’t require complicated techniques or hours in the kitchen. With just a few high-quality ingredients and 10 minutes of your time, you can create a dish that’s both impressive and incredibly satisfying.
The beauty of this recipe lies in its simplicity – it lets the premium ahi tuna shine while the sesame crust adds texture and the ginger soy sauce provides the perfect flavor complement. Whether you’re planning a romantic dinner, entertaining friends, or simply treating yourself to something special, this dish delivers every time.
Give this recipe a try and discover how easy it is to bring restaurant-style dining to your own table. I’d love to hear about your experience – feel free to share your variations or tips in the comments below!
FAQs
Where can I buy sushi-grade ahi tuna?
Look for sushi-grade ahi tuna at specialty fish markets, higher-end grocery stores with good seafood departments, or Japanese markets. Always ask your fishmonger specifically for sushi-grade tuna that’s safe to eat raw.
What if I can’t find sesame seeds?
You can substitute with crushed macadamia nuts, pistachios, or even everything bagel seasoning for a different but delicious crust. The key is having something that will create texture and stick to the fish.
Can I make this without the raw center?
Absolutely! Simply cook the tuna for 3-4 minutes per side instead of 1-2 minutes. You’ll lose the traditional contrast of textures, but it will still be delicious.
How do I know if my tuna is fresh enough?
Fresh sushi-grade tuna should have a deep red color, firm texture, and clean ocean smell – never fishy. Purchase from reputable sources and use within 24 hours for best quality and safety.
What’s the best pan to use for searing?
A heavy-bottomed skillet, cast iron pan, or stainless steel pan works best. Avoid non-stick pans as they don’t get hot enough to create the proper sear.
Can I prepare this dish in advance for a dinner party?
The sauce and garnishes can be prepared ahead, but the tuna should be seared just before serving for the best texture and food safety. The actual cooking only takes 3-4 minutes, so it’s easy to do last minute.
Simple Seared Ahi Tuna Recipe
- Total Time: 10 minutes
- Yield: serves 4 people 1x
Description
There’s something almost magical about the contrast between the warm, crispy sesame crust and the cool, buttery-soft center that makes seared ahi tuna such a show-stopper. This dish has its roots in Japanese tataki cooking techniques, where high-quality fish is briefly seared while keeping the interior completely raw. The result is pure elegance on a plate – and surprisingly simple to achieve at home.
Ingredients
For the Tuna:
- 1 pound sushi-grade ahi tuna steaks (about 1-inch thick)
- 2 tablespoons sesame oil
- 3 tablespoons black sesame seeds
- 3 tablespoons white sesame seeds
- 1 teaspoon kosher salt
- 1/2 teaspoon black pepper
For the Soy Ginger Sauce:
- 1/4 cup low-sodium soy sauce
- 2 tablespoons rice wine vinegar
- 1 tablespoon fresh ginger, finely grated
- 1 teaspoon honey
- 1/2 teaspoon sesame oil
For Garnish:
- 1 avocado, sliced
- 2 scallions, thinly sliced
- 1 cucumber, julienned
- Pickled ginger (optional)
- Wasabi (optional)
Substitution Notes: Can’t find black sesame seeds? Use all white sesame seeds instead. For gluten-free options, ensure your soy sauce is tamari. If you’re avoiding sesame, try a light coating of crushed pistachios or macadamia nuts for a different but equally delicious crust.
Instructions
Remove your sushi-grade ahi tuna from the refrigerator 15-20 minutes before cooking to bring it closer to room temperature. Pat the steaks completely dry with paper towels – this step is crucial for achieving that perfect sear. Brush all sides lightly with sesame oil.
Chef’s Secret: The drier the surface, the better the sear. Don’t skip the patting dry step, even if it seems excessive.
In a shallow dish, combine black sesame seeds, white sesame seeds, kosher salt, and black pepper. Mix well with your fingers to distribute evenly. Press each tuna steak firmly into the mixture, coating all sides generously. The oil will help the seeds adhere beautifully.
Pro Tip: Use the palm of your hand to really press those seeds into the fish. You want them to stick well so they don’t fall off during searing.
While the tuna sits, whisk together soy sauce, rice wine vinegar, grated ginger, honey, and sesame oil in a small bowl until the honey dissolves completely. Taste and adjust – you might like it a bit sweeter or more tangy.
Place a heavy-bottomed skillet or cast-iron pan over medium-high heat. Let it get properly hot – you should feel strong heat when you hold your hand about 6 inches above the surface. Don’t add any oil to the pan; the sesame oil on the tuna is sufficient.
Visual Cue: The pan is ready when a drop of water sizzles and evaporates immediately.
Gently place the tuna steaks in the hot pan. You should hear an immediate, satisfying sizzle. Sear for 1-2 minutes per side, depending on thickness. You want a golden-brown crust with about 1/4 inch of cooked fish around the edges while keeping the center completely pink and cool.
Critical Point: Resist the urge to move or press the tuna. Let it sear undisturbed to develop that gorgeous crust.
Remove the tuna to a cutting board and let it rest for 1 minute. Using a very sharp knife, slice against the grain into 1/4-inch thick slices. Clean your knife between cuts for the cleanest presentation.
Nutrition
- Calories: 280-320
- Fat: 12-15g
- Carbohydrates: 3-5g
- Protein: 35-40g